welcome to another Step towards the DDay event!
Tactical (and operational) questions
So, last weekend saw me running my Soviet force trough an Tournament (called Tanks to the east, an ongoing series with changing focus, this time it was 50% of the List must be tanks [in the wider sense of the word] so i brought a bunch of T34 and their Heroic KV 1 friend, great event, great people all around! For those curious, i went 1:2, which is good enough for an start
https://www.tabletopturniere.de/t3_tournament.php?tid=34526 )
But now, lets talk about tactics for the Canadian, to take Juno beach of the axis (or maybe defend Juno beach, i offered to prepare an army for both sides, in case the sign ups should be uneven)
But first, let us take a look at what we are talking about!

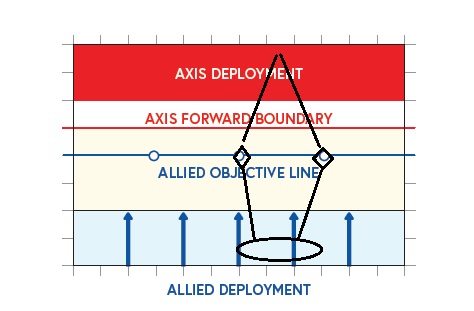
So, here we have it, the Mission for the landing. Simple, right?
Lets go deeper into the Tasks at hand.
First of all, as you can see, Allies move from the water (Blue area, 12″ in length) onto the Beach (yellow area, 18″ in length)
The objectives are (as it seems) 12″ deep into the beach.
Right after the Beach, we got the defenders forward Boundary, of aprox. 6″
Followed by the defenders deployment area of another 12″
The Scoring (or Mission goals) are twofold, first of all, we have two Tactical goasl:
Take and Hold the objectives (shown as white circles with blue borders)
Those give 1 (one) Point per Turn / objective, i can keep 6 (that´s six) models within 3″ of an objective.
For every Axis unit destroyed, 1 (one) point.
Then, we have an operational Goal (a goal which furthers the situation in the next scenario, as opposed to the tactical goal, which exists just for this mission)
For each of my Units, which makes it off the table, via the Axis edge, Allies score 10 (Ten) points.
Against those goals, stand the Axis goals, of which there are two:
The Tactical Goal:
For every Allied unit destroyed, the Axis score 1 (one) point .
The operational Goal:
Prevent an Allied breakthrough, which is worth 5 (five) points.
Additional rules are:
The Axis units can never enter the Beach (yellow) area (and thus, can never enter the water (blue) area.
Given those information, we can already formulate a simple idea about the Mission:
The objectives are to be seen as an means to an end, namely, hold them while my units pass them, during their approach of the Axis deployment Area
Removing defenders from the table, while it gives points, is something which does not need to be pursued to hard.
Fulfilling the operational Goal (getting of the table) is the most important Goal here.
Even simple math tells us, if one unit makes it off the Table, the score is set to 10:0
So the axis would need to take out 10 (ten) of my units for each one which makes it off the table.
With those facts in mind, i would state the mission at this point as follows:
Pick one objective, either the right, or left, side one.
Concentrate forces toward the chosen objective and the center objective.
Move with due haste toward the two objectives
When at the objectives, focus on creating an corridor within the defenders Area, to move trough.
Get moving again – do not stop before leaving the table.
As picture, it would look like this:
Yes, it looks kinda cheap, and easy.
Gather the troops in the circled area, move along the two lines toward Diamond.
Set up on Diamond for an quick and focused removal of the defenders Units.
Move along the lines off the table.
Lets take a second to remember von Clausewitz here, according to him, all tings are simple, and the simple things are hard.
If we look at the mission map above again, we see that it is already split up in nice 6″ by 6″ squares (the lines at the border)
This will be helpful in a second, as we now confront our nice and easy plan with „reality“ (as in: the rules of the game and the defenders)
Numbers, numbers, more numbers!
So, lets talk a few numbers, which interfere with our plan.
Given we have 0 (zero) ideas about the terrain, or the exact force comp of the defenders, we can only work with the facts we have:
Given the theater selector the defenders have to use (i talked about my options already) it is safe to state that the defenders will be mostly Green
That means, the hit things always with an -1 to hit (so shooting at close range resembles an coin flip) but there is more:
Green units, as soon as they take their first loss, have a chance to get upgraded to regulars (or go to ground and take a ton of additional Pin markers)
Next thing is, weapon ranges on Bolt action are similar for weapon „categories“ (meaning, all rifles are the same, all Sub-machine guns are the same, all machine guns are the same, and so on)
The most important ranges here are:
24″
36″
18″
12″
for max range of the most common weapons.
And half of that (so 12″ 18″ 9″ and 6″ respectively) for short range
At long range, shooting is at another -1
If my troops go to ground at long range, that’s another -2 meaning, hitting will be nigh impossible for the defenders when at long range, against gone to ground units.
Considering my troops start at the edge of the table, and the defenders set up at the edge of their deployment, we have roughly 35″ of distance (36″ to the edge, but the models take some space on the edge)
The good news:
Entirely outside of the range for 3 of the 4 most common infantry weapons.
The no so good news:
Just barely inside the range for one kind of guns.
The rather bad news:
Those are machine guns
the VERY bad news:
Those are German machine guns
That means roughly (depending on the list of the defender) 42 Dice to be thrown in the direction of my units.
Even with green defenders, some of them will hit, and a few will take models out.
Even when gone to ground, statistic would say one hit per turn, and one successful damage roll every other turn.
But alas, sitting around is not what the mission is about, moving forward is.
Troops move (when firing) at an speed of 6″ per turn, or 12″ when not firing.
and the defenders are free, to move towards the Beach, into their forward boundary area (white on the map)
(which would be the wrong option i would say, given i have to come to them anyway)
Given both sides move toward each other during turn one, the distance between both will be reduced by 12″ (if they fire on the move)
leaving a distance of 35″ – 12″ = 23″ which suddenly brings rifles into the equation as well (yet everything is at long range still!)
So, still kinda safe. But i think shooting at this range, is a risky plan of action. Why?
Because the defenders are Green, given the chance to hit and to wound are not very high, means at most one removed model from defender units,
which could just upgrade them to regular, making them hit roughly 16% more often, and it makes them harder to wound as well!
Another option would be, the defenders stay dug in, and my units move 12″
would still put us at the same range.
If my units run, an the defender moves forward, we talk suddenly about 17″ between both sides, which is short range for machine guns….
(what if the defender run? Simple: They can not, because they can only move into the white area, which is 6″)
So running turn 1 is a bad idea (turning one Hit per turn into 6 (SIX!) hits and 3 removed models on average dice!)
I mean, do not get me wrong, i HAVE to move into the defenders guns, there is no way around it.
But i aim to minimize the defenders time to shoot at my units in short range.
So, my basic plan for turn 1 will be most likely:
Advance 6″ towards the Defenders.
leaving 42″ between my units and the table edge (where they collect 10 VP each and run into the hinterlands to regroup)
That means, in movement distances, 3 Turns of running and one Turn of regular movement.
So one unit, if a bit of care is applied, needs 5 Turns (move, run, run, run, move) to leave the table.
If they just run, we talk about 4 Turns (4 * 12 = 48)
So, we already have an idea, about the time (or number of turns) it will take to get off the table.
Still easy right, move, run, run, run, move, call it a day.
Except:
As mentioned, during turn 1, there will be most likely 1 Hit – no damage.
Turn 2 (if defenders do not move, and attackers run) the Distance is 18″
So short range for machine guns, long for rifles, barely inside another weapon group, still outside of the really short range weapons.
Given i would say, defenders max out on squads and gear, we talk about (roughly)
42 Dice at short range
25 Dice at long range
With all modifiers, Turn 2 my units face (on average):
13,944 removed models from the short range shooting
4,15 Models removed from the long range shooting.
Meaning a total loss of 18,94 models lost, or:
Two full sections from 5
And we are just two turns in, from 5 we need….
but worry not! it will get worse, massively so, from here.
Running for the second time, means the distance is now 6″ (reminder, the defenders did not move forward, but their deployment extends 12″ forward)
that is called „point blank range“ and gives an bonus to hit.
Given all weapons can fire freely now, we add another 15 Dice to the above, resulting in:
82 Dice thrown in the general direction of my units, if all defenders are still green, that means:
41 Hits on average
20.5 Models removed on average
So another 2 sections, bringing my list down to 1 section, which will have lost 2 models already.
If some defenders should have changed from green to regular, it will be even worse.
the problem is, at this point we are looking at 18″ or two turns, to go until the table edge is reached.
there will be absolutely nothing left to ever reach the table edge.
Theoretical final scoring:
Allies 2 (from passing the objectives)
Axis 5 (no breakthrough) plus 5 for units removed.
So 2 to 10.
The funny thing is, if i would only get one unit off table, i would win by score and not even by a small margin.
With one unit escaped, it would look as follows:
Allies 2 (from the objectives) + 10 for escaping = total VP = 12
Axis: 5 from removing units
But!
that is a gambit, and it does go against the spirit of the event.
So we are back to zero, well, not exactly zero right?
We got a rough idea of how to move, and when to move.
We got an rough idea of the time which is required (in turn) to reach the Edge and a rough idea of safe and very threatening points on the map.
So how can we leverage this knowledge and improve on the plan?(beside grabbing an AVRE ) Let us look at another (simple) visualization

So, the rough outline for the movement is still the same, the colors mean:
Bright green = save as it gets
Dark green = kinda risky, but not overly threatening
Orange = dangerous
Red = lethal as it gets
Black lines = 6″ increments
One thing is instantly visible! holding the objectives does not require units in the most dangerous zone, and, starting with an run is better than starting
with an regular advance move. Both keep the units within the save as it gets zone.
From there, another run could get my units within reach of the objectives, but well within the dangerous zone.
What we know already is, the orange zone means, about 2 Sections lost per turn lingering there.
Yet, it means two squads lost or the defenders as well.
Given my units are regular, vs. the Green defenders, which means shooting over all ranges favors me ever so slightly, if! i can take out full units, else there is the risk of them turning regular, if the squad does not get removed in one go.
So i can, somewhat safely state:
Starting to run onto the beach,
advancing more slowly over the dark green zone
is a good approach to keep loses low.
From the orange zone onward, my units should stay at the max. possible distance to the objectives (3″ away, which is 15″ out from the defenders, sitting ON the objectives means 12″ out, if you check weapon ranges above, you will see how this does make a difference)
So, to close out for today, i can state the following:
Priority is to get squads of the table.
It is safe up to 18″ in (if only basic inf. is concerned)
When taking the objectives, the approach needs to be done via advance, and my units start out with an (small) advantage, IF i move my units only as far forward as required to hold them.
From there, Attacks can be done, with an focus of removing full squads. which i need to do anyway, to punch a hole in the defenders line.
Final notes:
I did assume open ground everywhere
the averages are rough averages based on D6 rolls, although i rounded a bit here and there
The whole thing is painted in very broad stokes, fine tuning follows in later parts – the use of weapon teams and specialists included.